QuantiFit2™ Knowledge Base
QuantiFit2™ Hardware
Yes, the QuantiFit2™ may be used outdoors. It is not designed to be used in inclement weather such as rain, sleet or snow. The QuantiFit2™ is for use at a temperature range of 5°C to 45°C (41°F – 113°F), maximum relative humidity of 80% non-condensing and pollution degree 2.
In the Settings menu, click on “Setup Respirators.” Click on the purple plus sign and enter the respirator information. The inhalation valve question is to indicate whether or not the valve prop prompt needs to be displayed.
In the Settings menu under Admin Menu, there is a button for “Change Regulation.” Click on this button, select the preferred regulation, and click the green checkmark.
In the Settings menu under the Admin Menu, click on “Setup Operators.” Click on the plus sign (+) and enter the appropriate information. This is also where you can designate an operator as an administrator.
In the People/Test screen, select a person from the list, and click on the pink “History” button. A list of all tests related to this person will show in a list to browse through, export, or print.
This is a setting that automates how a fit test is started. The person being tested needs to take a breath sharp enough for the circle on the screen to turn green and then hold their breath. The test will begin on its own and there is no need for the test subject to do anything other than to continue to hold their breath until the step ends after 8-10 seconds.
Auto advance will move to the next test step when the current test step has passed. If the test step fails, there will be an opportunity to save that step or retry the step.
DATABASE: In the Settings > Admin Menu, there is a selection for saving the entire database to a jump drive.
RECORDS: To save test records this can be done from a person’s record, or through the report section.
- Through an individual’s records, the History button will show the tests that belong to this person, and each one can be printed individually.
- In the reports section, reports can be printed for groups or individuals selected by date and/or company.
The Seal Check button allows a test subject to perform a user seal check with the assistance of the QuantiFit2™. When the Seal Check button is held down continuously, an internal pump will seal the respirator. This will not draw a negative pressure. Once the respirator is sealed, the wearer can perform a positive and/or negative pressure user seal check.
The amount of records the QuantiFit2™ can hold is virtually unlimited from a practical standpoint. The internal storage should allow hundreds of thousands to millions of test records to be stored.
In the Settings menu, under the System Info section that contains details about the instrument. There are Current Date and Current Time fields that can be changed by pressing on one of the values.
Using OHD Logic Software
The software can be found on our Software Downloads page.
OHD Logic software will be updated periodically to enhance features, add features, or fix bugs. OHD provides the software updates to the listed owner of the equipment via email and the latest version is always available on our Software Downloads page.
Yes. The installation must be completed by someone logged into the PC who has administrative privileges.
RESPIRATOR-Specific Instructions
When the operator is experiencing difficulty getting anyone to pass on these masks, the answer typically lies within the Scott Connector, p/n 200423-01. It is recommended that the operator keep a spare part, and replace them at minimum once each year.
Please follow these instructions when fit testing with this Scott Connector with our Kit #1 part number 9513-0130.
- The connector must be modified to be used for fit testing, and once modified, it must not be used during the need for a respirator.
- There are two valves that must be removed, a clear circular valve on the bottom, and the valve that can be seen when looking into the opening where the OHD adapter will be threaded into.
- The threaded opening must have a rubber washer, but you must be able to clearly see into the connector.
- The exhalation valve is dirty
- This can occur even when the part is brand new
- You must remove the rubber sleeve that protects the exhalation valve.
- With water or a mask wipe, clean the underside of valve as well as the circle on which it rests

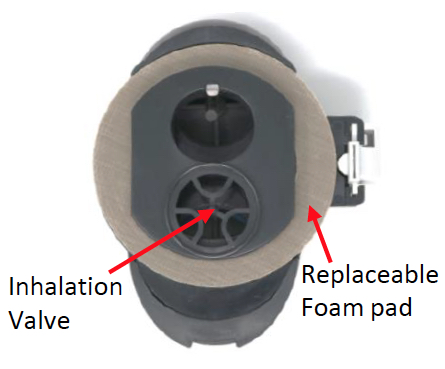
- Foam pad is worn out
- Over time, the foam pad that creates the air-tight seal against the mask, can lose its cushioning ability.
- This foam pad can lose elasticity whether it is being used or not, and many times is revealed when a company begins the fit testing for the year.
- The concnetric circles where the pad connects to the mask, get more and more compressed over time and lose their air-tight function.
- If the company has a certified Scott technician, the technician can replace the foam pad. If not, the entire part must be ordered.
- One sign that the foam rubber is too old, is when a first step or first person might pass, but every following test produces a failure.
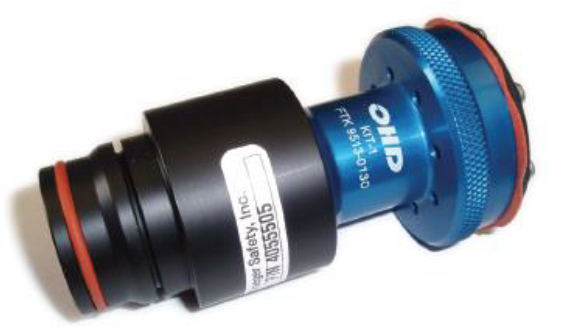
Please follow instructions when using Draeger Mini Rap connector 4055505 with OHD Kit #1 (9513-0130) fittest adapter.
This combination will work with any snap-in connection on a Draeger respirator.
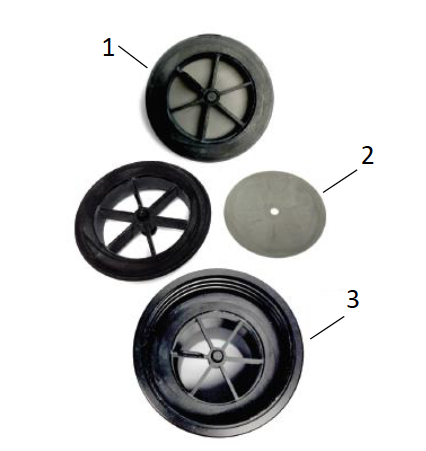
To prep the Rap Adapter, you must remove the spokewheel (1) on the threaded side, remove and discard the flat diaphragm (2) and then reinsert the spoke wheel gasket (3).
The Kit #1 adapter will screw into the threaded side of the Mini Rap adapter, and opposite end of the Rap (with the O-ring) can be inserted into the front of the respirator until it clicks into place.
The only maintenance required on this Rap adapter is to be sure the rubber gasket remains clean. This part will last for many years with normal use.
The Inhalation valve must be removed from the ISI part #171138. (Image shows part without diaphragm.) This is an orange/red diaphragm that is attached to the under-side of the cross-hair plastic.
The 171138 must be attached to the front of the respirator. First you will remove the front portion of the respirator by unscrewing the 4 screws. The inside hex nut uses a 5/16 nut driver and the outside uses a 3/32 allen wrench. The 171138 will replace the front portion of the respirator.
After the 171138 part has been attached to the respirator, prop or remove the inhalation valve, then attach Kit #1 into the female threading.
Since this ISI piece is not easily moved to another respirator, ideally you will want to have surrogate masks in each size of the respirator. The OSHA fit test requirement is that you must have one of each size for the test subject to try.

Testing the MSA Ultra Elite respirators requires the OHD Kit #38, 9513-0380.
- Regulator must be removed from mask for fit testing.
- Insert adapter into the front opening of the mask, and the O-rings will create an air-tight seal. (Fig. 1)
- The silver prongs will prop open the inhalation valve to prepare the mask for testing. Do not twist the adapter on the mask or it could do damage to the gasket in the mask.
- Connect the clear tubes to the two-connector side and the blue tube to the single- connector side (Fig. 2)
- Perform fit test
There are two things to look for if you are having trouble getting people to pass with this respirator.
- Make sure that the bottom of the adapter says “Rev B.” If it has no Rev, or Rev A, Contact OHD to update your adapter.
- When the adapter is twisted onto the side of the mask, there is a natural stopping point. You must then turn harder so that it will travel another quarter inch. If left at the first stop, the adapter will not make an airtight seal.
Fit Testing
When several subjects can’t pass, this could indicate:
Machine Fault:
- You must do the daily verification at the beginning of each day.
- If the QuantiFit2™ successfully completes the dual tube calibration without an error message, this assures that the machine is operating properly and within tolerance.
- If the QuantiFit2™ does not complete the dual tube verification, service might be needed. Please contact OHD technical support.
Adapter Fault:
- The adapters must be kept clean and in good shape.
- Disconnect and reconnect all tubes to make sure they all “snap” into place for a secure connection
- For our OHD aluminum adapters, make sure all eight screws are tight as well as the quick connect posts that the tubes attach to.
- If the adapter had been dropped or crushed, a hairline crack might cause leakage.
If you are still running into issues, contact OHD technical support for assistance.
If others are passing the fit test but one person is not, this could indicate:
- Poor fit: Try a different size or brand of respirator.
- Facial hair or obstructions: Hair, scars, or anything breaking the seal can prevent a proper fit.
- Improper breathing technique: Make sure the test subject is holding their breath correctly during the test.
- Dirty mask or exhalation valve: Even if it looks clean, wipe the inside of the valve with a cleansing cloth.
- Eardrum defect (rare): In some cases, a perforated eardrum can affect pressure-based fit tests.
If you are using one of OHD’s integrated valve prop adapters, the inhalation valve does not need to be propped open or removed.
If you are using one of OHD’s older adapters, you will need to prop open or remove the inhalation valve. To begin the test, the QuantiFit2™ exhausts air out of the respirator to get to the target negative pressure. If the inhalation valve is in place, the QuantiFit2™ will pull the inhalation valve shut. This usually shows up on the graph as a lot of up and down movement when the test begins.
To prop open the inhalation valve, use a valve prop. You can also remove the valve entirely. For the two-adapter kit, the side with two ports is the side that requires the inhalation valve to be propped or removed.
You will need to remove the prop or replace the inhalation valve once fit testing is complete.
OSHA 1910.134 Appendix A:
“4. (a) (4) The respirator filter or cartridge needs to be replaced with the CNP test manifold.
The inhalation valve downstream from the manifold either needs to be temporarily removed
or propped open.”
The QuantiFit2’s CNP technology eliminates the need to delay testing on mask users that have just eaten or smoked. You can test immediately with the QuantiFit2™ respirator fit testing device.
Controlled Negative Pressure (CNP) is a method of quantitative respirator fit testing (QNFT) that pulls and maintains a negative pressure inside a respirator by removing, and directly measuring, any air that leaks into the facepiece. It is accepted by OSHA, ISO, and other regulatory bodies. OSHA cites controlled negative pressure in OSHA 1910.134 Appendix A.